


Raghunandhanan Narasimhan writes a detailed tactical analysis about the Premier League match that ended Chelsea 5-0 Everton.
Chelsea put in probably the best performance of the season so far in the Premier League by any team, against Everton, running out 5-0 winners against Ronald Koeman’s side. Chelsea were absolutely rampant and clinical up front with a brilliant all round performance. Antonio Conte now has enjoyed four consecutive wins after switching to the 3-4-3 formation in the Premier League. Chelsea have scored 14 goals in those games and conceded none in the process.

Chelsea: 13. Courtois; 28. Azpilicueta, 30. Luiz, 24. Cahill; 15. Moses, 21. Matic, 7. Kante, 3. Alonso; 11. Pedro, 10. Hazard, 19. Costa.
Everton: 22. Stekelenburg; 5. Williams, 6. Jagielka, 25. Funes Mori; 23. Coleman, 15. Cleverley, 18. Barry, 8. Barkley, 20. Oviedo; 14. Bolasie, 10. Lukaku.
Everton play five at the back
While Chelsea have enjoyed great success in recent weeks by playing the 3-4-3 it was a surprise to see Everton play three centre backs at the back too. They set up in 5-3-2 formation with Lukaku and Bolasie playing up front while Cleverley, Barry and Barkley played in the midfield. There was contrasting width in offer by the two teams with Chelsea stretching play out through their wingbacks. Everton defended with 5 at the back while their central midfielders stayed very compact squeezing out the space in the centre.

Here we see the set up by Everton. Coleman and Oviedo played as wing backs with Funes Mori, Jagielka and Williams being the centre backs. The midfield three are compact and focussed in the center.
The opening fifteen minutes of the game saw Chelsea dominate possession with Everton sitting very deep and not offering space at the back. This worked out well before they conceded against Hazard and before they could recover they let in another one through Marcos Alonso.
Switch to the back four for Everton
Falling behind so early in the game, Koeman switched to a 4-2-3-1 bringing in Mirallas on for wing back Oviedo and pushing Funes Mori to left back. Barkley moved further up with Mirallas and Bolasie flanking him. It was difficult to see how Everton wanted to play as they defended for the better part of the game. There was no significant change in pattern despite this tactical reshuffle. This was mainly due to the passive nature of Everton’s play who did not press and trouble Chelsea enough. This meant that Chelsea could pick Everton apart at their will.
Passive pressing from Everton
There was lack of cohesion in the Everton pressing. Once they fell behind, Everton realised the need to have the ball to influence the game. The pressing was either absent, or when it was done, it lacked the structure and coordination to cause Chelsea problems.

We see Bolasie trying to press the ball here. Cahill moves the ball to the left flank. The three central midfielders of Everton are not close enough to Kante or Matic. Once the ball moves out we see that Lukaku is still in the same position while the midfielders have moved apart but with no use.

Kante and Moses are on the right side while Matic is not pressed enough to make a mistake. He still has enough options and the Chelsea players offered great off the ball movement to make sure they circulated the ball with ease.
Chelsea’s build up play
Chelsea played similar to how they have been playing in recent weeks. They played with a lot of energy in the build ups with a lot of positive passing up front. Because Everton were passive in their pressing it meant Chelsea played through the Everton team.

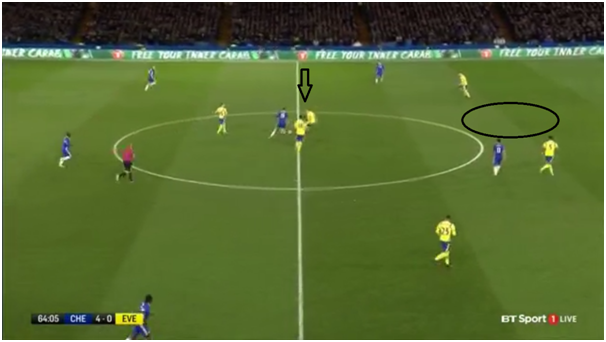
The first feature of Chelsea’s play saw them overloading a wing or the center and switching the ball to the other wing so that they could initiate 1v1s against the Everton back line. This can be seen below where N’golo Kante switches the ball to the other flank to Marcos Alonso. The wing back is free to receive the ball as he cannot get too close to Alonso as this would mean there would be a break in the chain of back five. This space would then mean Costa can move into the space. Since the midfield three of Everton are always compact on the ball near side, the other flank is left free for either Moses or Alonso to move into and receive the ball.
There were always options for Chelsea to pass to whenever and wherever they had the ball. There were a lot of instances throughout the game where they had two or even three free options to pass to. This was mainly due to the effort put in by the Chelsea with excellent off the ball contribution from all the players.

This is one of the best examples to see how Chelsea enjoyed such domination. The three midfielders of Everton are compact and cover Matic and Kante. David Luiz has the ball but Bolasie and Lukaku are unsure to close him down as this would leave Azpilicueta and Cahill free to receive the ball. Added to this, Hazard now drops down to offer himself for the ball. There were so many options for Chelsea to pass their way around Everton.

Another such instance is seen now with Kante having the ball. He has many options around him. Alonso and Hazard are seen creating an overload on the left. Cleverley does not close them down and neither does Coleman. Because of having to adhere to the positional structure, Everton now have eight players to defend against six players from Chelsea. But there was absolutely no pressure from Everton and Moses offers width on the other side. Oviedo cannot close him down due to Pedro being positioned in the half space.
Chelsea without the ball
Chelsea defended with a flat 5 at the back when Everton had the ball. They defended without much fuss by not offering space for the Everton front line, with Lukaku especially having a very quiet game. Since the midfield has only Kante and Matic in it, either of the two players pressed their zones when they were the ball near midfielder.

Here we see Chelsea in a back five with Kante and Matic ahead of them. Matic moves a bit forward to cover the zones as he is the ball near midfielder. Now Everton have two triangles formed. But they are rendered totally ineffective, both with the choice of pass made by the Everton players and also the lack of penetration effected by them. Pedro dropped behind in case Moses would face a 1v1 against Oviedo. Here Hazard does not drop back to make a four and instead cuts off the passing lanes between the midfielders.

There were cases of the 5-4-1 too with Hazard falling back and Chelsea sitting with the two banks and letting Everton have the ball. Lukaku was always closely marked as seen in the both the above cases whereas Alonso in particular showed excellent positioning to make sure that Everton did not advance down the flanks.
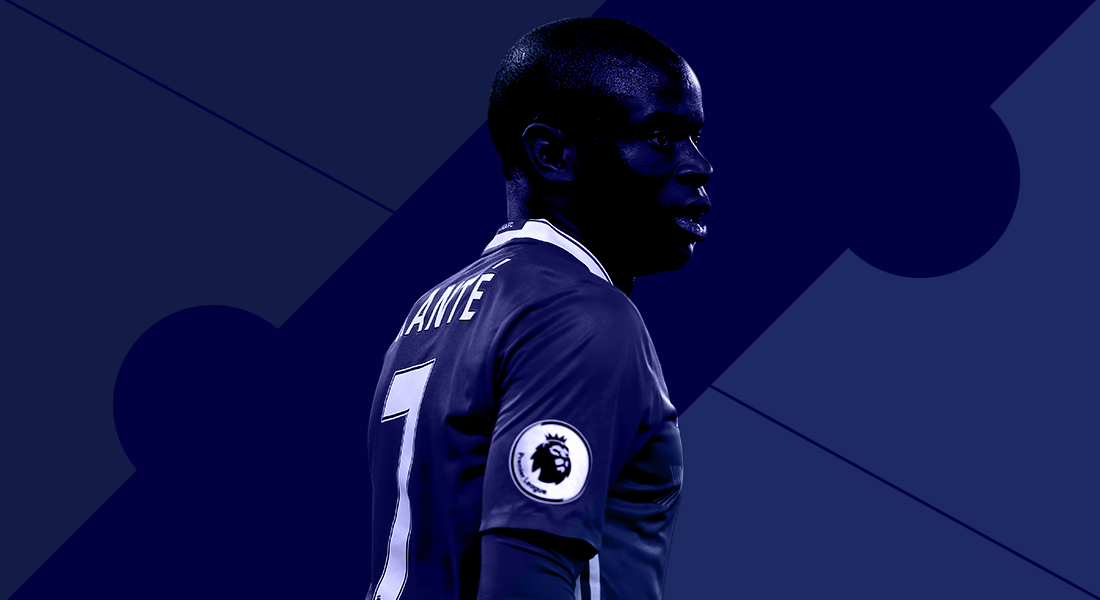
Kante’s terrific positional sense gave him a head start on the Everton players leading with 4 interceptions ( 2 more than any player on the pitch).2 of these came in the opposition half leading to turnovers and quick counter attacks.(according to whoscored.com) The interceptions and turnovers in play higher up the pitch were a trademark of how Chelsea played with their first goal coming in that fashion.

Matic wins the ball and immediately releases Costa. Now a 3v3 situation is seen with the ball near wing back (Coleman) out of position. Costa plays in Hazard who scored the goal. The individual quality of the Chelsea front line was the main outlet of Chelsea’s attacks with Hazard in rampant form.
The effectiveness of Hazard and Pedro
The main reason why the two flanking forwards in this system- Hazard and Pedro have been enjoying success is down to the lesser defensive burden on them. Added to this, Diego Costa has been brilliant in the way he has operated something similar to a false nine at times in his movements to create space in behind for Hazard or Pedro to move into. The heat map of Costa shows that he inclines to drop more towards the left so that Hazard can benefit from this.

via whoscored.com
Though being the only striker in the team, Costa made a lot of selfless runs and contributed to the team’s offensive on the whole. This means that Hazard and Pedro can move into the spaces. This also creates a dilemma for the opposing defenders whether or not to follow him. This helps in creating overloads in the midfield.
The fifth goal is a result of Costa dropping into the midfield.
Costa drops to the midfield and receives the ball. Jagielka tries to close him down and gets nutmegged. Costa can now drive into the space with Coleman and Williams unable to close him down due to the presence of Hazard and Pedro.
With the 3-4-3 formation looking tailor made for Hazard, the formation brings the best out of the front three. Hazard especially enjoys a free role in this system popping up in places where he wishes to. Hazard was the most fouled player, the player with most successful passes in the attacking third and most shots on target on the night. The direct nature of his play is underlined by the fact that he had the most number of successful passes to Costa with 12.
Hazard has enjoyed this freedom mainly due to the nature of the formation with Marcos Alonso marauding up and down the pitch in the left flank. Added to this the defensive contributions made by Kante and Matic, Hazard has the license to be creative up front. He has more access to the attacking zones in the pitch and this is where he is dangerous from.

via whoscored.com
The major difference in how Hazard has been playing now compared to last season is that he has popped up frequently in the right flank too. He scored against Southampton from that side and repeated the trick in this match too with an excellent solo goal. The creative freedom he is enjoying has worked wonders in his favour and a big problem for opposition defenders who find it difficult in marking him.

via whoscored.com
This is the touch map of both Alonso and Matic. The work rate of both these players down the left hand side is very tremendous. This means that Hazard has total license to roam around while Alonso and Matic can cover the pitch for him.
Because of the nature of Hazard’s movements, Seamus Coleman endured a torrid time down the right hand side for Everton not knowing when to follow Hazard when he dropped deep and when to get tight to him. The second goal was the result of a centre back following him till the half way line (Ashley Williams) only to get beaten and it was exactly this space wherein the goal resulted in with Alonso scoring the goal.

The situation can be seen above as Williams closes down till the half way line only for Hazard to move into the vacated space. The ball eventually worked into the box and Alonso shot from exactly where Williams should have been had he not moved up front.
Conclusion
The most impressive thing from the Chelsea players from the match was that there was no drop in the energy levels despite enjoying a comfortable lead. The work rate did not drop and they constantly looked to increase their lead. In the end they ran out deserved winners with a 5-0 score line. The fact that it came against a team which was previously the second best defense in the league makes it all the more impressive. Ronald Koeman’s team just did not impress and were second best in all the aspects of the game. The fact that they could manage only one shot (off target) over the whole game showed the dominance that Chelsea enjoyed.
Read all our other tactical analyses here.

Manchester United fan and a tactics afficianado. Loves quality holding midifielders